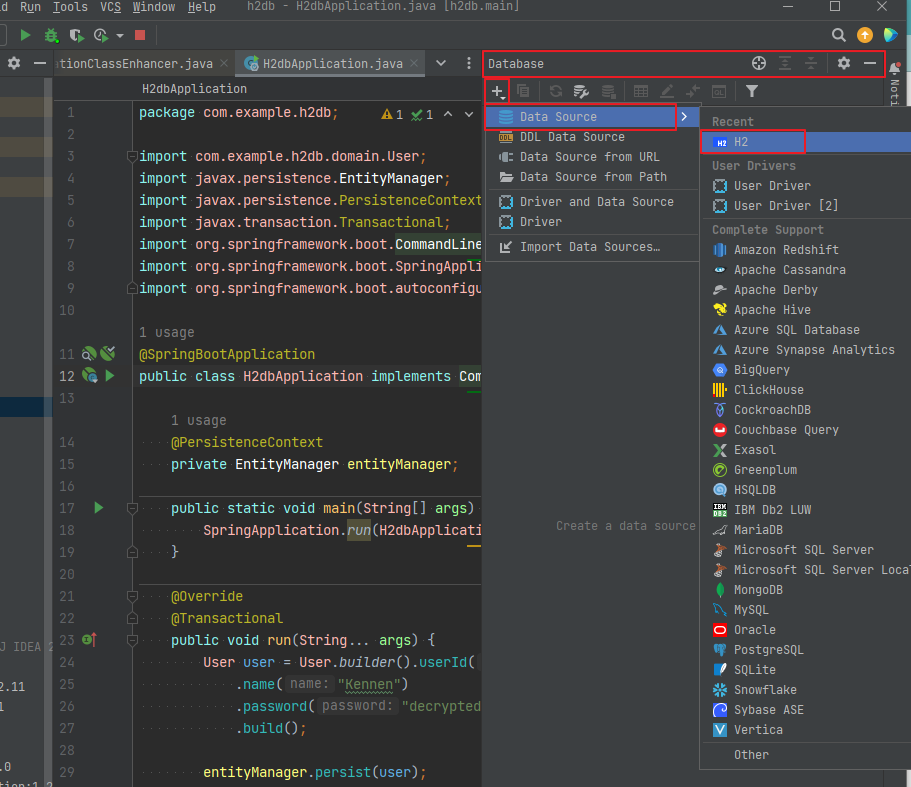
H2 DB를 사용하기 전에는 매번 DBMS에 접속하여 스키마를 변경하며 진행했다.

프로젝트 초반에는 스키마 변경이 잦기 때문에 기존 방식은 효율적이지 못했다.


이미 많은 사람들이 H2 DB를 사용하여 개발을 진행하고 있을 것이기 때문에 글을 작성하는 것이 큰 의미는 없다 생각한다.

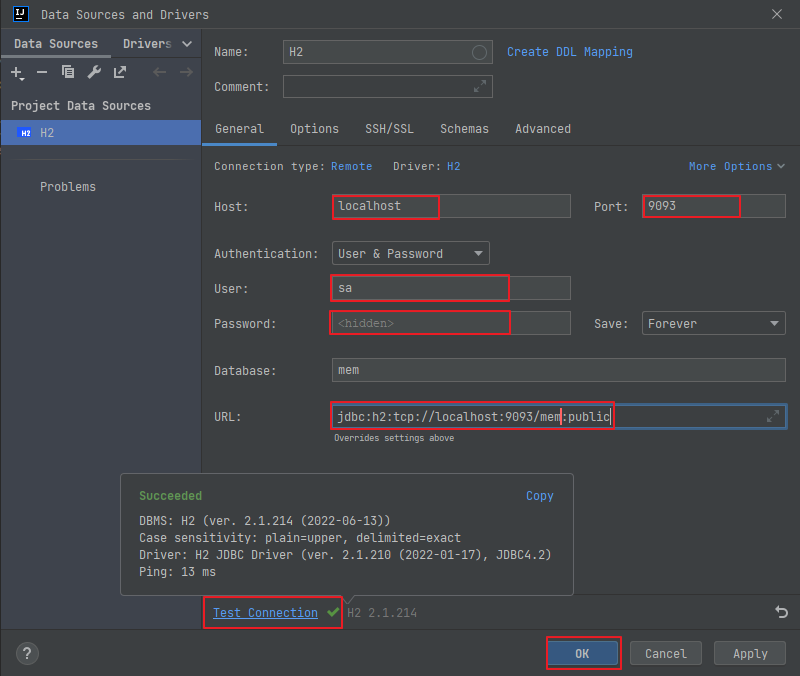
다만 메모리 DB 이기 때문에 외부에서 접속하기 위해서는 TCP 연결을 해야 한다.

이 부분이 안되는 경우가 있어서 나중에 다시 보려고 한다.

(Spring 보다는 Intellij 팁에 가깝다.)


필수 항목

  • Intellij Ultimate Edition (Intellij에 있는 Database tool을 사용하기 때문에)


1. Spring Boot Application 프로젝트 생성

2. 의존성 추가

dependencies {
    // Database
    implementation 'com.h2database:h2'
    implementation 'org.springframework.boot:spring-boot-starter-data-jpa'
    // Etc
    implementation 'org.projectlombok:lombok'
    annotationProcessor 'org.projectlombok:lombok'
    annotationProcessor "org.springframework.boot:spring-boot-configuration-processor"
    // Test
    testImplementation 'org.springframework.boot:spring-boot-starter-test'    
}

3. application.yml

spring:
  datasource:
    hikari:
      driver-class-name: org.h2.Driver
      jdbc-url: jdbc:h2:mem:public;
      username: sa
      password: 1234
  jpa:
    hibernate:
      ddl-auto: create-drop
      naming:
        implicit-strategy: org.springframework.boot.orm.jpa.hibernate.SpringImplicitNamingStrategy
        physical-strategy: org.springframework.boot.orm.jpa.hibernate.SpringPhysicalNamingStrategy
    show-sql: true
    database-platform: org.hibernate.dialect.H2Dialect
    properties:
      hibernate:
        format_sql: true
logging:
  level:
    org.hibernate: info
    org.springframework: info

4. Configuration

import java.sql.SQLException;
import javax.sql.DataSource;
import org.h2.tools.Server;
import org.springframework.boot.context.properties.ConfigurationProperties;
import org.springframework.boot.jdbc.DataSourceBuilder;
import org.springframework.context.annotation.Bean;
import org.springframework.context.annotation.Configuration;

@Configuration
public class H2DBConfig {

    @Bean
    @ConfigurationProperties(prefix = "spring.datasource.hikari")
    public DataSource dataSource() throws SQLException {
        Server.createTcpServer("-tcp", "-tcpAllowOthers", "-tcpPort", "9093").start();
        return DataSourceBuilder.create().build();
    }
}

5. Entity 생성

import java.time.ZonedDateTime;
import javax.persistence.Column;
import javax.persistence.EntityListeners;
import javax.persistence.GeneratedValue;
import javax.persistence.GenerationType;
import javax.persistence.Id;
import javax.persistence.MappedSuperclass;
import javax.persistence.PrePersist;
import javax.persistence.PreUpdate;
import lombok.Getter;
import org.springframework.data.jpa.domain.support.AuditingEntityListener;

@EntityListeners(AuditingEntityListener.class)
@MappedSuperclass
@Getter
public abstract class BaseEntity {

    @Id
    @GeneratedValue(strategy = GenerationType.IDENTITY)
    @Column(name = "id", nullable = false)
    private Long id;

    private ZonedDateTime createdDate;

    private ZonedDateTime modifiedDate;

    @PrePersist
    public void createDate() {
        createdDate = ZonedDateTime.now();
        modifiedDate = createdDate;
    }

    @PreUpdate
    public void updateDate(){
        modifiedDate = ZonedDateTime.now();
    }

}
import javax.persistence.Column;
import javax.persistence.Entity;
import javax.persistence.Index;
import javax.persistence.Table;
import lombok.AccessLevel;
import lombok.AllArgsConstructor;
import lombok.Builder;
import lombok.Getter;
import lombok.NoArgsConstructor;

@Table(name = "users", indexes = @Index(name = "idx_user", columnList = "userId", unique = true))
@Entity
@Builder
@Getter
@NoArgsConstructor(access = AccessLevel.PROTECTED)
@AllArgsConstructor(access = AccessLevel.PROTECTED)
public class User extends BaseEntity {

    @Column(nullable = false, length = 20)
    private String userId;

    @Column(nullable = false, length = 128)
    private String password;

    @Column(nullable = false, length = 20)
    private String name;
}

6. Application main (Test를 위한 코드이며 실무에서 따라 하지 마세요)

import com.example.h2db.domain.User;
import javax.persistence.EntityManager;
import javax.persistence.PersistenceContext;
import javax.transaction.Transactional;
import org.springframework.boot.CommandLineRunner;
import org.springframework.boot.SpringApplication;
import org.springframework.boot.autoconfigure.SpringBootApplication;

@SpringBootApplication
public class H2dbApplication implements CommandLineRunner {

    @PersistenceContext
    private EntityManager entityManager;

    public static void main(String[] args) {
        SpringApplication.run(H2dbApplication.class, args);
    }

    @Override
    @Transactional
    public void run(String... args) {
        User user = User.builder().userId("Kennen@email.com")
            .name("Kennen")
            .password("decryptedPassword")
            .build();

        entityManager.persist(user);
    }
}

7. 실행

./gradlew bootRun

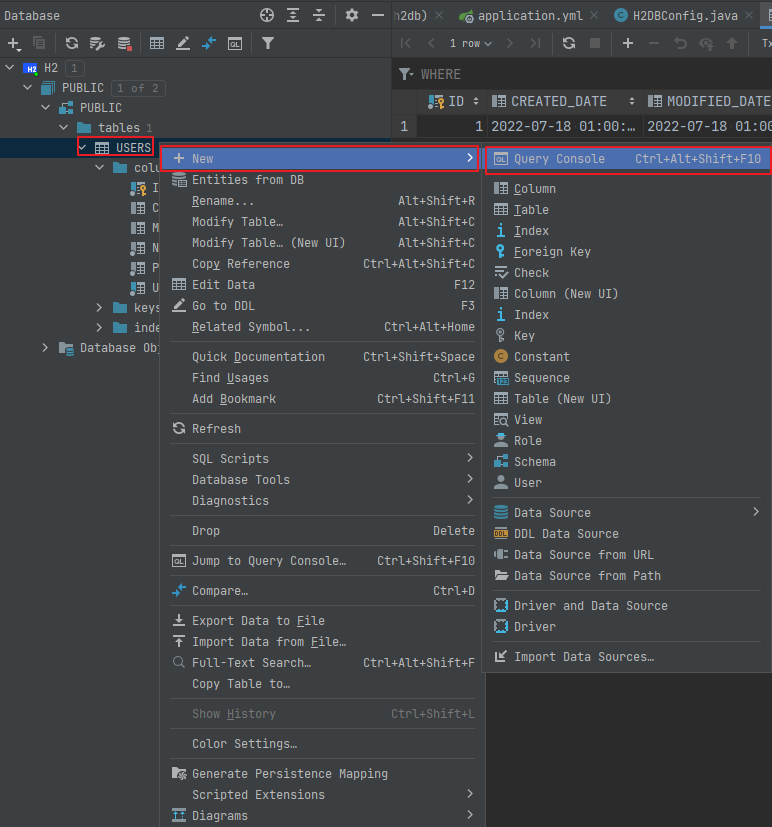
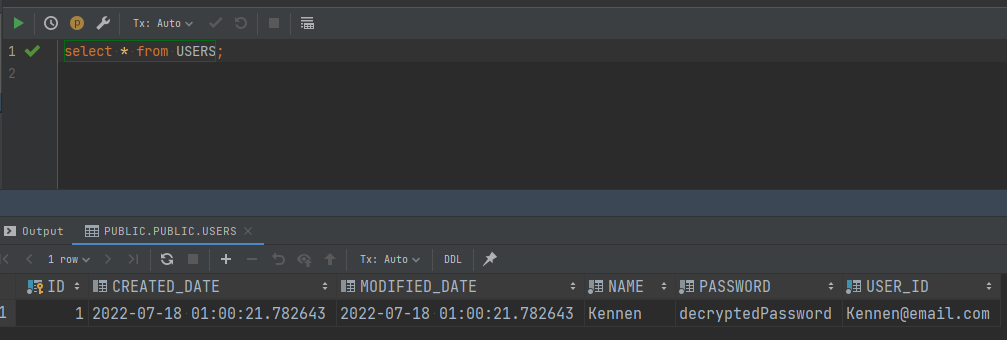
8. Database Tool 확인

password는 application.yml 에 작성되어 있다.


이렇게 접근하면 된다.

이상.

정규표현식이 필요한 경우가 생기는데 그때 를 위해  예제를 작성해놓고 참고하자.

  • 문자 1개
  • 포함된 문자
  • 포함된 문자 조합
  • 한번에 다 써보기


문자 1개

Regular Expression Decription example
. 문자 1개 "h".matches(".");
String text = "a"; // 문자 1개
System.out.println("a.matches(\".\") = " + text.matches("."));
System.out.println("a.matches(\"..\") = " + text.matches(".."));
output:
a.matches(".") = true
a.matches("..") = false

text = "aa"; // 문자 2개로 변경
System.out.println("a.matches(\".\") = " + text.matches("."));
System.out.println("a.matches(\"..\") = " + text.matches(".."));
output:
aa.matches(".") = false
aa.matches("..") = true

text = "*1"; // 특수문자와 숫자로 변경
System.out.println("*1.matches(\".\") = " + text.matches("."));
System.out.println("*1.matches(\"..\") = " + text.matches(".."));
output:
*1.matches(".") = false
*1.matches("..") = true

text = "한글"; // 한글로 변경
System.out.println("한글.matches(\".\") = " + text.matches("."));
System.out.println("한글.matches(\"..\") = " + text.matches(".."));
System.out.println("한글.matches(\".+\") = " + text.matches(".+"));
System.out.println("한글.matches(\".*\") = " + text.matches(".*"));
output:
한글.matches(".") = false
한글.matches("..") = true
한글.matches(".+") = true
한글.matches(".*") = true

text = ""; // 빈 문자열로 변경
System.out.println("\"\".matches(\".+\") = " + text.matches(".+"));
System.out.println("\"\".matches(\".*\") = " + text.matches(".*"));
output:
"".matches(".+") = false // 1개 이상이라서 false
"".matches(".*") = true // 0개 이상이라서 true

text = "강아지";
System.out.println("강아지.matches(\"강아.\") = " + text.matches("강아."));
System.out.println("강아지.matches(\"강아지.\") = " + text.matches("강아지."));
output:
강아지.matches("강아.") = true
강아지.matches("강아지.") = false // 강아지 뒤에 문자가 없기 때문에 false

text = "김철수";
System.out.println("김철수.matches(\"김.수\") = " + text.matches("김.수"));
output:
김철수.matches("김.수") = true

text = "김박수";
System.out.println("김박수.matches(\"김.수\") = " + text.matches("김.수"));
output:
김박수.matches("김.수") = true
  • 표현식 한개당 문자 1개를 의미
  • 표현식을 두개 사용하면 문자 2개를 의미한다.
  • 특수문자, 숫자, 한글 모두 가능하다.
  • 표현식 뒤에 '+' 를 붙이면 '문자 1개 이상' 을 의미한다.
  • 표현식 뒤에 '*' 를 붙이면 '문자 0개 이상' 을 의미한다.
  • 정해진 문자가 있고 특정 위치에 임의의 문자가 필요한 경우 사용하면 좋을듯하다.

정규표현식에 포함된 문자 1개

Regular Expression Decription example
[expression] expression에 포함된 문자열 중에 하나라도 존재하면 true "a".matches("[abc]")
String text = "a";
System.out.println("a.matches(\"[abc]\") = " + text.matches("[abc]"));
System.out.println("a.matches(\"[bcd]\") = " + text.matches("[bcd]"));
output:
a.matches("[abc]") = true
a.matches("[bcd]") = false

text = "abc";
System.out.println("abc.matches(\"[abc]\") = " + text.matches("[abc]"));
System.out.println("abc.matches(\"[abcd]\") = " + text.matches("[abcd]"));
output:
abc.matches("[abc]") = false
abc.matches("[abcd]") = false

text = "My name is Kennen";
System.out.println("text.matches(\"My [Nn]ame is Kennen\") = " + text.matches("My [Nn]ame is Kennen"));
output:
text.matches("My [Nn]ame is Kennen") = true


  • 표현식에 포함된 문자 1개를 의미
  • !!주의 : 1개 이상을 표현하진 않기 때문에 문자 "abc"를 "abc" 에 적용했을 경우 false이며, "abcd" 에 적용했을 경우에도 false이다.

정규표현식에 포함된 문자 1개 + 조합

Regular Expression Decription example
[expression][expression] 정규표현식에 포함된 문자 1개 조합 "af".matches("[abc][efg]")
String text = "af";
System.out.println("af.matches(\"[ab][fg]\") = " + text.matches("[ab][fg]"));
System.out.println("af.matches(\"[af]\") = " + text.matches("[af]"));
output:
af.matches("[ab][fg]") = true
af.matches("[af]") = false

text = "afyl";
System.out.println("text.matches(\"[ae][fg][yj][lm]\") = " + text.matches("[ae][fg][yj][lm]"));
output:
text.matches("[ae][fg][yj][lm]") = true
  • 반드시 포함되어야 하는 문자가 있는 경우 사용

한번에 다 써보기

String text = "My Name is Kennen";
System.out.println("text.matches(\"My [Nn]ame is .[ea][nm][nm]en\") = " + text.matches("My [Nn]ame is .[ea][nm][nm].."));
output:
text.matches("My [Nn]ame is .[ea][nm][nm]en") = true


OffsetDateTime, ZonedDateTime

LocalDateTime 외에 OffsetDateTime, ZonedDateTime이 존재한다.


각각 어떤 값을 가지는지 디버깅 모드에서 확인해보자.

우선 각각을 .now() 메소드를 통해 현재 시간을 가져온다.

LocalDateTime localDateTime = LocalDateTime.now();
OffsetDateTime offsetDateTime = OffsetDateTime.now();
ZonedDateTime zonedDateTime = ZonedDateTime.now();

이제 디버깅 모드에서 각각의 값을 확인해보자.

intellij 의 debugger 창 캡쳐

  • LocalDateTime : 날짜, 시간
    • 날짜와 시간만 존재한다.
    • 시차 정보가 없기 때문에 다른 위치에 있는 서버에서 동시에 저장되는 경우 다른 시간으로 저장 되며 같은 시간이라는 것을 알 수 없음
  • OffsetDateTime : 날짜, 시간, offset(GMT 기준)
    • LocalDateTime에 offset 정보가 추가 됨
    • 시차 정보가 있기 때문에 다른 위치에 있는 서버에서 동시에 저장되는 경우 시차 정보를 통해 같은 시간임을 알 수 있음
  • zonedDateTime : 날짜, 시간, offset(GMT 기준), zone
    • OffsetDateTime에 zone 정보가 추가 됨
    • 시차 정보와 함께 지역 정보까지 확인 가능

LocalDateTime + ZoneId

atZone을 사용하면 LocalDateTime 에 zone 을 추가할 수 있다.

LocalDateTime now = LocalDateTime.now();
ZonedDateTime saoPauloZonedDateTime = now.atZone(ZoneId.of("America/Sao_Paulo"));
ZonedDateTime seoulZonedDateTime = now.atZone(ZoneId.of("Asia/Seoul"));

  • LocalDateTime에 Zone  정보를 추가하여 Zone(Region), offset 정보를 나타냄

ZonedDateTime에서 Zone, Offset 을 제거한 LocalDateTime 으로 변환도 쉽습니다.

LocalDateTime localDateTime = seoulZonedDateTime.toLocalDateTime();

withZoneSameInstance를 사용하면 ZonedDateTime에 다른 Zone으로 변경도 가능합니다.

ZonedDateTime now = LocalDateTime.now().atZone(ZoneId.of("Asia/Seoul"));
ZonedDateTime londonZonedDateTime = now.withZoneSameInstant(ZoneId.of("Europe/London"));

output : 
now = 2022-05-31T14:17:24.852151+09:00[Asia/Seoul]
londonZonedDateTime = 2022-05-31T06:17:24.852151+01:00[Europe/London]

Period, Duration

Perioed.between 메소드는 LocalDate 만을 매개변수로 받는다.

따라서 OffsetDateTime이나 ZonedDateTime 을 사용할 경우 .toLocalDate() 메소드를 사용하면 된다.

하지만 Duration.between 메소드의 경우 Temporal(Interface) 을 매개변수로 받는데, LocalDateTime, OffsetDateTime, ZonedDateTime 모두 Temporal을 구현한 클래스이므로 사용이 가능하다.

물론 LocalDateTime과 ZoneDateTime을 각각 다르게 넘기는 것도 가능하다.

LocalDateTime localDateTime = LocalDateTime.now();
ZonedDateTime zonedDateTime = ZonedDateTime.of(localDateTime, ZoneId.of("America/Sao_Paulo"));

Duration duration = Duration.between(localDateTime, zonedDateTime);

LocalDateTime 을 사용하는 방법에 대해서 작성한다.

OffsetDateTime과 ZonedDateTime도 같이 사용할 수 있다.


1. toLocalDate, toLocalTime, get*

// 현재 날짜 및 시간
LocalDateTime now = LocalDateTime.now();
System.out.println("[now] = " + now);
System.out.println("now.getYear() = " + now.getYear()); // 년
System.out.println("now.getMonth() = " + now.getMonth()); // 월
System.out.println("now.getMonthValue() = " + now.getMonthValue()); // 월(숫자)
System.out.println("now.getDayOfMonth() = " + now.getDayOfMonth()); // 일
System.out.println("now.getHour() = " + now.getHour()); // 시
System.out.println("now.getMinute() = " + now.getMinute()); // 분
System.out.println("now.getSecond() = " + now.getSecond()); // 초 

// 현재 날짜만 빼오기
LocalDate date = now.toLocalDate();
System.out.println("[date] = " + date);
System.out.println("date.getYear() = " + date.getYear()); // 년
System.out.println("date.getMonth() = " + date.getMonth()); // 월
System.out.println("date.getMonthValue() = " + date.getMonthValue()); // 월(숫자)
System.out.println("date.getDayOfMonth() = " + date.getDayOfMonth()); // 일

// 현재 시간만 빼오기
LocalTime time = now.toLocalTime();
System.out.println("[time] = " + time);
System.out.println("time.getHour() = " + time.getHour()); // 시
System.out.println("time.getMinute() = " + time.getMinute()); // 분
System.out.println("time.getSecond() = " + time.getSecond()); // 초
output:

[now] = 2022-05-16T21:33:19.350698
now.getYear() = 2022
now.getMonth() = MAY
now.getMonthValue() = 5
now.getDayOfMonth() = 16
now.getHour() = 21
now.getMinute() = 33
now.getSecond() = 19

[date] = 2022-05-16
date.getYear() = 2022
date.getMonth() = MAY
date.getMonthValue() = 5
date.getDayOfMonth() = 16

[time] = 21:33:19.350698
time.getHour() = 21
time.getMinute() = 33
time.getSecond() = 19

2. 연산(Plus, Minus)

LocalDateTime now = LocalDateTime.now();
System.out.println("now = " + now);

// PLUS
System.out.println("now.plusYears(2) = " + now.plusYears(2));
System.out.println("now.plusMonths(5) = " + now.plusMonths(5));
System.out.println("now.plusDays(10) = " + now.plusDays(10));
System.out.println("now.plusHours(5) = " + now.plusHours(5));
System.out.println("now.plusMinutes(10) = " + now.plusMinutes(10));
System.out.println("now.plusSeconds(20) = " + now.plusSeconds(20));

// MINUS
System.out.println("now.minusYears(2) = " + now.minusYears(2));
System.out.println("now.minusMonths(5) = " + now.minusMonths(5));
System.out.println("now.minusDays(10) = " + now.minusDays(10));
System.out.println("now.minusHours(5) = " + now.minusHours(5));
System.out.println("now.minusMinutes(10) = " + now.minusMinutes(10));
System.out.println("now.minusSeconds(20) = " + now.minusSeconds(20));

System.out.println("now = " + now);
output:

now = 2022-05-16T22:08:59.398040

now.plusYears(2) = 2024-05-16T22:08:59.398040
now.plusMonths(5) = 2022-10-16T22:08:59.398040
now.plusDays(10) = 2022-05-26T22:08:59.398040
now.plusHours(5) = 2022-05-17T03:08:59.398040
now.plusMinutes(10) = 2022-05-16T22:18:59.398040
now.plusSeconds(20) = 2022-05-16T22:09:19.398040

now.minusYears(2) = 2020-05-16T22:08:59.398040
now.minusMonths(5) = 2021-12-16T22:08:59.398040
now.minusDays(10) = 2022-05-06T22:08:59.398040
now.minusHours(5) = 2022-05-16T17:08:59.398040
now.minusMinutes(10) = 2022-05-16T21:58:59.398040
now.minusSeconds(20) = 2022-05-16T22:08:39.398040

now = 2022-05-16T22:08:59.398040


  • 가장 첫줄과 마지막 줄의 now 가 같은 것이 보일 것이다. plus, minus 메소드를 통해서 연산을 하더라도 객체 생성시 가지고 있는 값은 변하지 않는다.
  • plus, minus 메소드에서 다음 문구 확인 가능 : This instance is immutable and unaffected by this method call.

3.  비교(isBefore, isAfter, isEqual)

LocalDateTime now = LocalDateTime.now();
System.out.println("now = " + now);
LocalDateTime after2Years = now.plusYears(2);
System.out.println("after2Years = " + after2Years);

System.out.println("now.isBefore(after2Years) = " + now.isBefore(after2Years));
System.out.println("now.isAfter(after2Years) = " + now.isAfter(after2Years));
System.out.println("now.isEqual(after2Years) = " + now.isEqual(after2Years));
output:

now = 2022-05-16T22:18:59.727866

after2Years = 2024-05-16T22:18:59.727866

now.isBefore(after2Years) = true
now.isAfter(after2Years) = false
now.isEqual(after2Years) = false

4. Period

LocalDate startDate = LocalDate.now();
System.out.println("startDate = " + startDate);

LocalDate endDate = startDate.plusYears(2).plusMonths(3).plusDays(4);
System.out.println("endDate = " + endDate);

Period between = Period.between(startDate, endDate);

System.out.println("between.getYears() = " + between.getYears());
System.out.println("between.getMonths() = " + between.getMonths());
System.out.println("between.getDays() = " + between.getDays());
output:

startDate = 2022-05-17
endDate = 2024-08-21

between.getYears() = 2
between.getMonths() = 3
between.getDays() = 4
  • 날짜 또는 기간 차이에 대한 계산
  • 출력된 내용을 보면 getYear, getMonths, getDays 는 두 날짜의 시작과 끝의 대한 차이가 아니라는 것이 확인된다.
  • 각 항목에 대한 차이만 확인 가능하다.
    • 2022년과 2024년 차이 = 2년
    • 5월과 8월 차이 = 3
    • 17일과 4일 차이 = 4 
  • endDate가 startDate 보다 이전인 경우 음수로 표현된다. isNegative 메소드로 확인 가능

5. Duration

LocalDateTime startDate = LocalDateTime.now();
LocalDateTime endDate = startDate.plusMonths(4);
Duration between = Duration.between(startDate, endDate);
System.out.println("between = " + between);
System.out.println("between.toDays() = " + between.toDays());
System.out.println("between.toHours() = " + between.toHours());
System.out.println("between.toMinutes() = " + between.toMinutes());
System.out.println("between.toSeconds() = " + between.toSeconds());
output:

between = PT2952H
between.toDays() = 123
between.toHours() = 2952
between.toMinutes() = 177120
between.toSeconds() = 10627200
  • 시간 차이에 대한 계산
  • endDate가 startDate 보다 이전인 경우 음수로 표현된다. isNegative 메소드로 확인 가능

6. Date Format 지정하기

API 응답에 읽기 쉬운 포맷으로 날짜와 시간을 보내줘야 하는 경우가 있는데, DateTimeFormatter 를 사용하면 된다.

// 현재 날짜 및 시간
LocalDateTime now = LocalDateTime.now();

// ISO : yyyy-MM-ddTHH:mm:ss
String isoDateTime = now.format(DateTimeFormatter.ISO_DATE_TIME);
System.out.println("isoDateTime = " + isoDateTime);

// 사용자 입력
String customFormat1 = now.format(DateTimeFormatter.ofPattern("yyyy-MM-dd HH:mm:ss"));
System.out.println("customFormat1 = " + customFormat1);

// 오전 / 오후
String customFormat2 = now.format(DateTimeFormatter.ofPattern("yyyy-MM-dd a HH:mm:ss"));
System.out.println("customFormat2 = " + customFormat2);

// Date / Time 각각
String formatDate = LocalDate.now().format(DateTimeFormatter.ofPattern("yyyy-MM-dd"));
System.out.println("formatDate = " + formatDate);
String formatTime = LocalTime.now().format(DateTimeFormatter.ofPattern("a HH:mm:ss"));
System.out.println("formatTime = " + formatTime);
output :

isoDateTime = 2022-05-17T00:44:24.137939

customFormat1 = 2022-05-17 00:44:24
customFormat2 = 2022-05-17 오전 00:44:24

formatDate = 2022-05-17
formatTime = 오전 00:44:24


'개발 > [Java] 사용하기' 카테고리의 다른 글

[LocalDateTime] 만들기  (0) 2022.05.16
[LocalDateTime] 기록  (0) 2022.05.16

LocalDateTime, LocalDate, LocalTime 에 대한 샘플 코드를 작성해본다.


LocalDateTime 의 경우 시간대(Offset, Zone) 정보 포함되어 있지 않기 때문에 여러 서버가 다른 지역에 있는 경우에 사용해서는 안된다.

동시에 생성된 두개의 LocalDateTime이 각자 다른 지역에 있는 서버에서 생성이 됐을 경우를 생각해보자.

시간대 정보가 있다면 두 객체의 시간이 다르더라도 시차를 계산하여 같은 시간에 만들어 졌다는 것을 알 수 있지만 시간대 정보가 없으면 두 객체가 동시에 만들어졌다는 것을 알 수 없기 때문이다.

이렇게 시차와 지역 정보가 필요한 경우에는 OffsetDateTime 또는 ZonedDateTime 을 사용하면 된다.(이것들도 작성할 예정이다.)

이와 관련된 내용은 다시 정리하기로 한다.

LocalDateTime의 사용법을 알고나면 OffsetDateTime과 ZonedDateTime의 사용은 수월하다.


이 글에서는 OffsetDateTime, ZonedDateTime 내용은 포함되지 않았다.


현재 날짜 및 시간

가장 간단한 내용으로 시작한다. 현재 시간

// 현재 날짜 및 시간
LocalDateTime now = LocalDateTime.now();
System.out.println("now = " + now);

// chicago 날짜 및 시간
LocalDateTime chicagoDateTime = LocalDateTime.now(ZoneId.of("America/Chicago"));
System.out.println("chicagoDateTime = " + chicagoDateTime);

// cuba 날짜 및 시간
LocalDateTime cubaDateTime = LocalDateTime.now(ZoneId.of("Cuba"));
System.out.println("cubaDateTime = " + cubaDateTime);

// LocalDate, LocalTime 으로 현재 날짜 및 시간
LocalDate dateNow = LocalDate.now(); // 현재 날짜
LocalTime timeNow = LocalTime.now(); // 현재 시간
LocalDateTime fromLocalDateAndTime = LocalDateTime.of(dateNow, timeNow);
System.out.println("fromLocalDateAndTime = " + fromLocalDateAndTime);
output:

now = 2022-05-16T18:36:25.400357
chicagoDateTime = 2022-05-16T04:36:25.402610
cubaDateTime = 2022-05-16T05:36:25.404441
fromLocalDateAndTime = 2022-05-16T18:36:25.404835

특정 날짜 및 시간

 // of custom
int year = 2020, month = 5, dayOfMonth = 16, hour = 6, minute = 24, second = 44;
LocalDateTime of = LocalDateTime.of(year, month, dayOfMonth, hour, minute, second);
System.out.println("of = " + of);

// of LocalDate, LocalTime
LocalDate dateNow = LocalDate.of(year, month, dayOfMonth);
LocalTime timeNow = LocalTime.of(hour, minute, second); // second is Optional
LocalDateTime ofLocalDateAndTime = LocalDateTime.of(dateNow, timeNow);
System.out.println("ofLocalDateAndTime = " + ofLocalDateAndTime);
output:

of = 2020-05-16T06:24:44
ofLocalDateAndTime = 2020-05-16T06:24:44

String To LocalDateTime

String input = "2022-05-16 21:07:12";
DateTimeFormatter formatter = DateTimeFormatter.ofPattern("yyyy-MM-dd HH:mm:ss");
LocalDateTime localDateTime = LocalDateTime.parse(input, formatter);
System.out.println("localDateTime = " + localDateTime);
output:

localDateTime = 2022-05-16T21:07:12
  • yyyy : 년
  • MM : 월
  • dd : 일
  • HH : 시
  • mm : 분
  • ss : 초

Date To LocalDateTime, Calendar To LocalDateTime

// from Date
Date date = new Date();
System.out.println("date = " + date);
LocalDateTime fromDate = LocalDateTime.ofInstant(date.toInstant(), ZoneId.systemDefault());
System.out.println("ldtFromDate = " + fromDate);

// from Calendar
Calendar calendar = Calendar.getInstance();
System.out.println("calendar = " + calendar);
LocalDateTime fromCalendar = LocalDateTime.ofInstant(calendar.toInstant(), calendar.getTimeZone().toZoneId());
System.out.println("fromCalendar = " + fromCalendar);
output:

date = Mon May 16 20:40:33 KST 2022
fromDate = 2022-05-16T20:40:33.709

calendar = java.util.GregorianCalendar[time=1652701233718,areFieldsSet=true,areAllFieldsSet=true,lenient=true,zone=sun.util.calendar.ZoneInfo[id="Asia/Seoul",offset=32400000,dstSavings=0,useDaylight=false,transitions=30,lastRule=null],firstDayOfWeek=1,minimalDaysInFirstWeek=1,ERA=1,YEAR=2022,MONTH=4,WEEK_OF_YEAR=21,WEEK_OF_MONTH=3,DAY_OF_MONTH=16,DAY_OF_YEAR=136,DAY_OF_WEEK=2,DAY_OF_WEEK_IN_MONTH=3,AM_PM=1,HOUR=8,HOUR_OF_DAY=20,MINUTE=40,SECOND=33,MILLISECOND=718,ZONE_OFFSET=32400000,DST_OFFSET=0]
fromCalendar = 2022-05-16T20:40:33.718


다음 글 : https://authentication.tistory.com/42

'개발 > [Java] 사용하기' 카테고리의 다른 글

[LocalDateTime] 사용하기  (0) 2022.05.16
[LocalDateTime] 기록  (0) 2022.05.16

형제들 : LocalDate, LocalTime


Java를 8 버전(또는 이후 버전)으로 시작하고 개발을 하고 있는 사람들은 날짜와 시간을 다룰 때 기본으로 사용하고 있을 것이다.


하지만 Date, Calendar 를 사용하던 나에게는 귀인이나 선물과도 같은 존재다.

예전부터 Java를 사용했거나 어떤 이유로 인해 오래된 프로젝트에서 Date 또는 Calendar 를 사용하는 사람들은 무슨 말인지 알 것이라 생각한다.

(모르는 사람들은 계속 몰라도 된다.)


다른 언어들과 비교하면 어떨지 몰라도 어쨌든 8 버전 이전과 비교하면 엄청난 발전이다.

(다른 사람 보다는 어제의 나와 비교하는 것이 중요하다.)


Date, Calendar 와의 비교라던지 장단점은 다른 블로그에 많으니
이곳엔 기초 사용법이나 팁을 남겨두고 기억이 나지 않을 때마다 확인하고자 한다.


다음글 : https://authentication.tistory.com/41

'개발 > [Java] 사용하기' 카테고리의 다른 글

[LocalDateTime] 사용하기  (0) 2022.05.16
[LocalDateTime] 만들기  (0) 2022.05.16

spring framework로 개발을 진행하고 Cache를 사용해본 사람이 보면 좋을 것 같다.


프로젝트를 진행 중에 CacheManger를 두 개를 별도로 가져가야 할 일이 생겼다.

회사에서 사용중인 공통모듈에 EhCacheManager가 추가가 되었는데, 현재 진행중인 프로젝트에서 이미 EhCacheManager를 사용중인 상태여서 문제가 발생했다.


해결방법은 간단하다.

하지만 어디에서 Exception을 발생하는지 그리고 어떤 과정을 통해 진행 되다가 Exception이 발생하는지 궁금해서 기록을 남기려고 한다.


문제 재현


추가한 의존성은 다음과 같다.

<parent>
        <groupId>org.springframework.boot</groupId>
        <artifactId>spring-boot-starter-parent</artifactId>
        <version>2.1.6.RELEASE</version>
        <relativePath/> <!-- lookup parent from repository -->
</parent>
...
etc..
...

<dependency>
	<groupId>org.springframework.boot</groupId>
	<artifactId>spring-boot-starter-web</artifactId>
</dependency>
<dependency>
	<groupId>org.springframework.boot</groupId>
	<artifactId>spring-boot-starter-cache</artifactId>
</dependency>
<dependency>
	<groupId>org.springframework.boot</groupId>
	<artifactId>spring-boot-starter-security</artifactId>
</dependency>
<dependency>
	<groupId>net.sf.ehcache</groupId>
	<artifactId>ehcache-core</artifactId>
	<version>2.6.10</version>
</dependency>


web 프로젝트를 추가하긴 했지만 실제로 브라우져에서 확인할 일은 없고, console에 서버가 잘 실행되는지 확인만 하려는 이유에서 추가했다.

security 프로젝트 역시 다중 Bean 설정을 확인하려고 추가한 것이고 다른 이유는 없다.

spring-boot-starter-cache와, ehcache-core 는 정말 필요해서 추가했다.


우선 다음과 같이 설정을 해보자.

@Configuration
@EnableCaching
public class DefaultCacheConfig {
    @Bean
    public CacheManager cacheManager() {
        return new EhCacheCacheManager(ehCacheCacheManager().getObject());
    }
    @Bean
    public EhCacheManagerFactoryBean ehCacheCacheManager() {
        EhCacheManagerFactoryBean cacheManagerFactoryBean = new EhCacheManagerFactoryBean();
        cacheManagerFactoryBean.setConfigLocation(new ClassPathResource("ehcache.xml"));
        cacheManagerFactoryBean.setShared(true);
        return cacheManagerFactoryBean;
    }
}

위와 같이 설정한 뒤 어플리케이션을 실행시켜 보도록 하자.

정상적으로 잘 실행이 될 것이다.(안된다면...로그를 잘 확인해보자.)


그럼 에러가 나는 상황을 만들어 보도록 하자.

@Configuration
@EnableCaching
public class DefaultCacheConfig {
    @Bean
    public CacheManager cacheManager() {
        return new EhCacheCacheManager(ehCacheCacheManager().getObject());
    }
    
    @Bean
    public CacheManager cacheManagerAnother() {
        return new EhCacheCacheManager(ehCacheCacheManager().getObject());
    }
    
    @Bean
    public EhCacheManagerFactoryBean ehCacheCacheManager() {
        EhCacheManagerFactoryBean cacheManagerFactoryBean = new EhCacheManagerFactoryBean();
        cacheManagerFactoryBean.setConfigLocation(new ClassPathResource("ehcache.xml"));
        cacheManagerFactoryBean.setShared(true);
        return cacheManagerFactoryBean;
    }
}

CacheManager Bean을 하나 더 추가 했다.


그리고 다시 어플리케이션을 실행시켜 보면 다음과 같은 메세지를 출력하면서 Exception이 발생 할 것이다.


빨간색 부분을 해석해 보면

CacheResolver가 지정되지 않았으며, CacheManager 타입으로 된 고유한 Bean이 없습니다.

한 개를 Primary로 지정하거나, 사용할 CacheManager를 지정하세요.


첫번 째 방법 : Primary


위에 나온대로 하나를 Primary로 설정해 보자.

Java Config를 사용하는 경우에는 @Primary annotation을 추가하면 되고, xml config를 사용하는 경우 빈 설정 시 primary=true 를 추가하면 된다.

    @Bean
    public CacheManager cacheManager() {
        return new EhCacheCacheManager(ehCacheCacheManager().getObject());
    }

    @Bean
    @Primary
    public CacheManager cacheManagerAnother() {
        return new EhCacheCacheManager(ehCacheCacheManager().getObject());
    }

다시 실행해 보면 정말 Exception이 발생하지 않는 것을 확인할 수 있을 것이다.


잘 되니까 궁금해졌다.

그래서 Primary로 지정하지 않은 상태에서 다시 어플리케이션을 실행하고 Exception을 찾아가본다.

CacheAspectSupport 클래스의 afterSingletonsInstantiated 메소드에서 NoUniqueBeanDefinitionException이 발생한 것이다.

즉 노란색 박스로 되어 있는 setCacheManager 메소드를 실행하는 과정에서 에러가 발생한 것이다.

더 자세하게는 Bean 관련 Exception이기 때문에 beanFactory.getBean 메소드를 실행하는 과정에서 발생했을 것이다. 또 찾아가본다.


디버깅을 통해서 메소드를 따라가다 보면 DefaultListableBeanFactory 클래스의 resolveNamedBean 메소드를 만나게 된다.


  1. RequireType 이 org.springframework.cache.CacheManager 인 이름의 Bean 후보군들을 가져온다.

  2. candidateNames 에 한 개만 있다면 그 이름으로 된 Bean 을 리턴한다.

  3. 1개 보다 많다면 Bean이 Primary Bean 을 반환한다. 이 때 Primary로 구분이 불가능 하면 NoUniqueBeanDefinitionException 을 throw 하게된다.

그렇다. 두 개 이상의 CacheManager를 Bean으로 등록해서 사용할 때에는 반드시 하나의 Bean에 Primary 설정을 해줘야 한다.


두 번째 방법 : CachingConfigurer (구현체 : CachingConfigurerSupport)

하나의 Bean을 Primary로 설정하는 방법 말고 다른 한가지 방법이 더 있다.


Config 클래스에서 CachingConfigurer를 구현하거나 CachingConfigurerSupport를 상속하면 된다.

Bean에서 @Primary annotation을 삭제하고 CachingConfigurerSupport를 상속받은 뒤에 다시 실행시켜 보자.


@Configuration
@EnableCaching
public class CacheConfig extends CachingConfigurerSupport {
    @Bean
    public CacheManager cacheManager() {
        return new EhCacheCacheManager(ehCacheCacheManager().getObject());
    }
    @Bean
    public CacheManager cacheManagerA() {
        return new EhCacheCacheManager(ehCacheCacheManager().getObject());
    }
    @Bean
    public EhCacheManagerFactoryBean ehCacheCacheManager() {
        EhCacheManagerFactoryBean cacheManagerFactoryBean = new EhCacheManagerFactoryBean();
        cacheManagerFactoryBean.setConfigLocation(new ClassPathResource("ehcache.xml"));
        cacheManagerFactoryBean.setShared(true);
        return cacheManagerFactoryBean;
    }

}

문제 없이 잘 실행되는 것을 확인할 수 있다.

왜일까?? 찾아가본다.

위 그림에서 확인할 수 있듯이 getCacheResolver() 메소드가 null 이 아니다.

따라서 beanFactory.getBan() 메소드가 실행되지 않게 되고 NoUniqueBeanDefinitionException 이 발생하지 않게 됐던 것이다.

getCacheResolver 메소드의 내용은 다음과 같다.

@Nullable
public CacheResolver getCacheResolver() {
	return SupplierUtils.resolve(this.cacheResolver);
}

즉 CachingConfigurerSupport를 상속받은 뒤에 cacheResolver가 더이상 null이 아닌 상태가 되었다.


cacheResolver가 어떻게 null이 아닌 상태가 될 수 있었는지 확인해 보니 다음과 같은 순서대로 진행되었다.


순서대로 글을 쓴 뒤에 이미지를 첨부하려고 한다.

  1. ProxyCachingConfiguration 설정 클래스가 실행되는 과정중에 상위 클래스인 AbstractCachingConfiguration 에 있는 setConfigurers 메소드가 실행이 된다.
  2. setConfigurers 메소드에서 useCachingConfigurer 메소드를 호출하는데, 이 때 파라미터로 받은 CachingConfigurer 객체 에서 cacheManager 를 가져와서 this.cacheManager 에 주입한다.
  3. ProxyCachingConfiguration 설정 클래스에 있는 BeanFactoryCacheOperationSourceAdvisor Bean이 등록되는 과정에서 CacheInterceptor Bean이 추가로 등록된다.
  4. CacheInterceptor Bean이 등록되는 과정에서 cacheResolver가 등록이 된다.
  5. cacheResolver가 등록이 되었기 때문에 getCacheResolver 메소드가 null이 아니므로 Bean을 찾지 않게 되고 에러가 나지 않게 되는 것이다.

글로 요약하면 감이 잘 오지 않기 때문에 소스 이미지를 추가하면서 확인해 보겠다.


1.ProxyCachingConfiguration 설정 클래스가 실행되는 과정중에 상위 클래스인 AbstractCachingConfiguration 에 있는 setConfigurers 메소드가 실행이 된다.

2. setConfigurers 메소드에서 useCachingConfigurer 메소드를 호출하는데, 이 때 파라미터로 받은 CachingConfigurer 객체 에서 cacheManager 를 가져와서 this.cacheManager 에 주입한다.

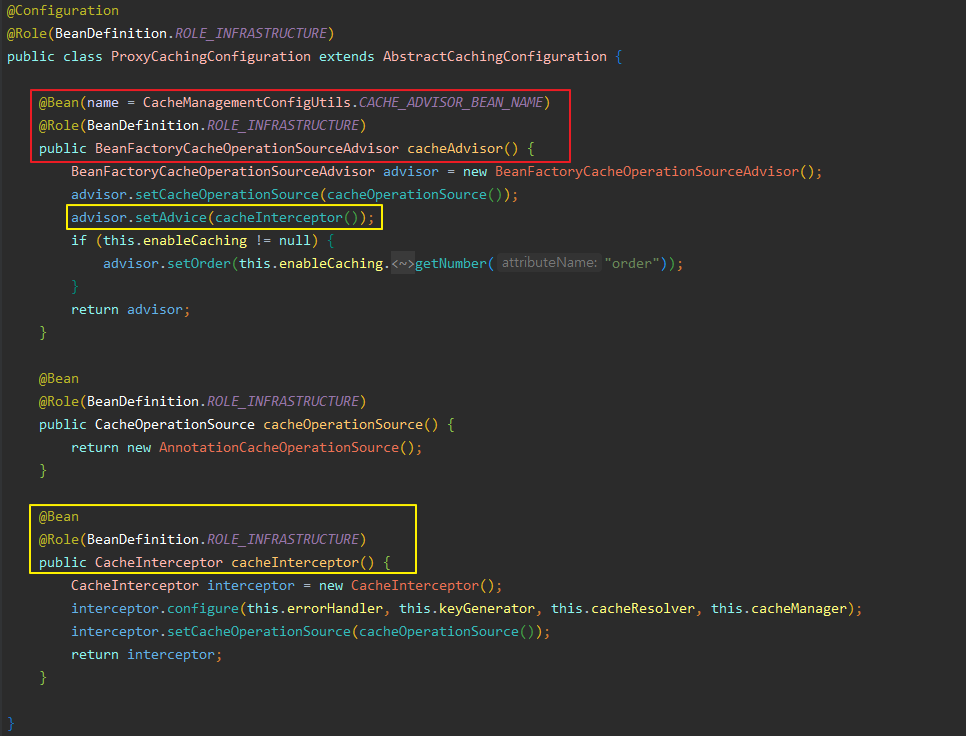
3.ProxyCachingConfiguration 설정 클래스에 있는 BeanFactoryCacheOperationSourceAdvisor Bean이 등록되는 과정에서 CacheInterceptor Bean이 추가로 등록된다.

4.CacheInterceptor Bean이 등록되는 과정에서 cacheResolver가 등록이 된다.

5.cacheResolver가 등록이 되었기 때문에 getCacheResolver 메소드가 null이 아니므로 Bean을 찾지 않게 되고 에러가 나지 않게 되는 것이다.


마지막으로, CachingConfigurerSupport 클래스를 Config 클래스에서 상속할 때에만 AbstractCachingConfiguration 클래스의 setConfigurers 메소드가 실행되는 이유를 설명하고 끝내겠다.


스프링이 Bean을 등록하는 과정에서 @Autowired annotation이 있는 메소드가 있으면 실행하도록 되어 있다.

하지만 이 때 한가지 조건이 있는데 해당 메소드로 넘겨질 parameter가 있을 경우에만 실행이 된다.

아래 소스를 보자. ( 너무 길어서 캡쳐를 따로 했다. 이어서 보면 된다.)

노란색 박스를 보면 arguments가 null 이 아니면 beanName으로 빈을 생성한다.

빨간색 박스를 보면 arguments가 null 이 아니면 method 를 실행한다.


method.invoke(bean, arguments); 가 실행이 되면 AbstractCachingConfiguration 클래스의 setConfigurers 메소드가 실행되는 것이다.


그런데 arguments에는 무엇이 들어 있을까??

beanFactory.resolveDependency 메소드를 실행 시켜서 Object 객체를 가져오게 되는데

org.springframework.cache.annotation.CachingConfigurer 객체를 가져오려고 한다.

우리가 등록한 설정 클래스인 DefaultCacheConfig 클래스에서 CachingConfigurerSupport 클래스를 상속 받았고 이 클래스는 org.springframework.cache.annotation.CachingConfigurer 인터페이스의 구현체이기 때문에 위에 있는 이미지에서 

Object arg = beanFactory.resolveDependency(currDesc, beanName, autowiredBeans, typeConverter)

를 실행한 결과 arg가 null 이 아니게 되며 arguments 역시 null아 아니게 되므로 

method.invoke(bean, arguments); 메소드가 실행이 되었던 것이다.


이상으로 기록을 마친다.

이전 글까지 Client 에 CAS를 이용한 Single Sign On 설정을 하고 로그인 테스트까지 해봤다.

이번 글에서는 다음 내용에 대해 알아보자.

  1. Client에 로그아웃을 설정한다. (클라이언트 로그아웃)
  2. Single Sign Out(단일 로그 아웃)을 설정한다.

먼저 Client에 로그아웃을 설정하는 것은 매우 간단하다.

Spring Security 설정 부분에 logout을 추가하면 된다.


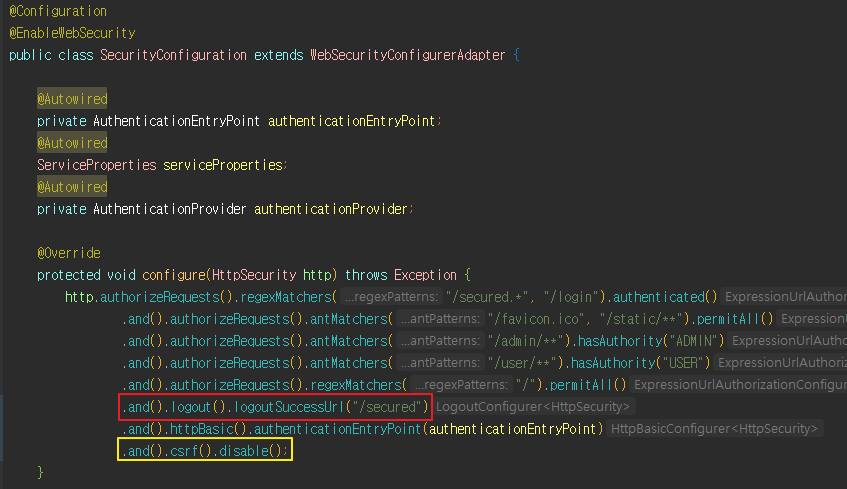
빨간색 박스 안에 있는 내용중에 '.logout()'을 추가하면 LogoutFilter 가 등록되고 URL Path에 '/logout/' 으로 입력하면 로그아웃 Filter가 실행 된다. 그리고  '.logoutSuccessUrl("/secured") 를 추가하면 로그아웃이 성공하면 '/secured' 로 이동 하라는 설정이다. ( .logoutSuccessUrl을 설정하지 않으면 Default로 '/login?logout' 으로 이동한다.)


노란색 박스 안에 있는 내용은 csrf 를 비활성화 시키는 것인데, 스프링 5 이후에는 csrf가 필수로 적용되어야 하는데 지금은 테스트를 하기 위한 작업이라서 비활성화 시켰다. (비활성화 해야 GET(HttpMethod)를 처리 한다.)


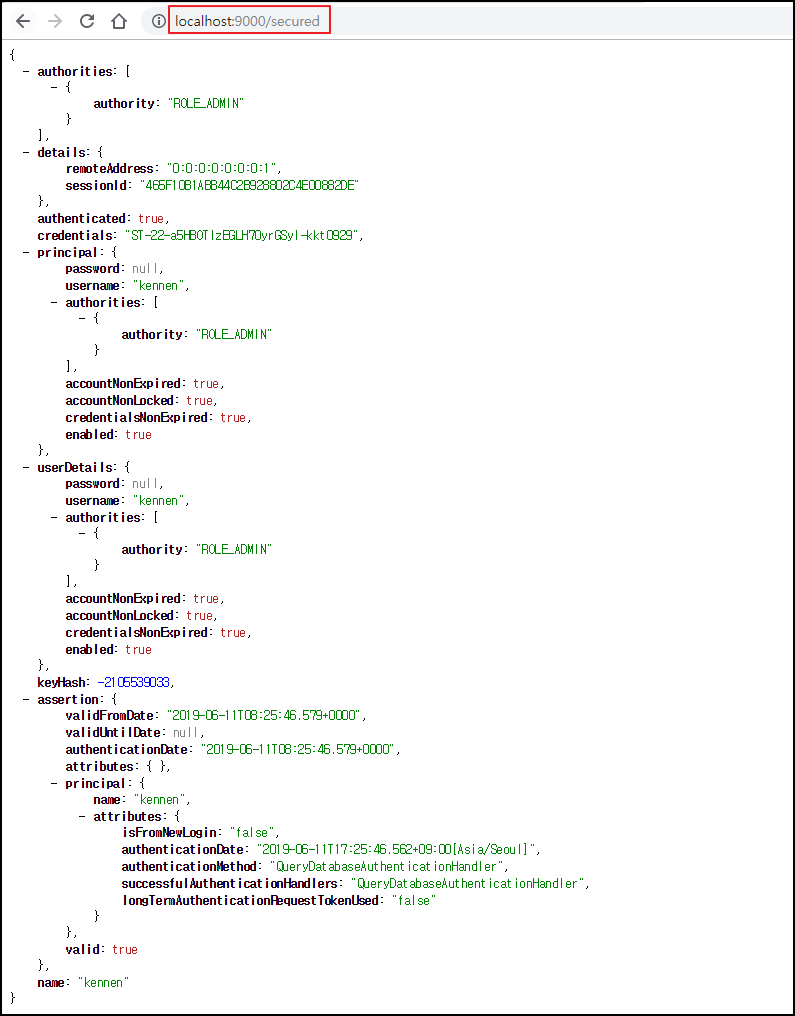
이전 글까지 했던 설정에 문제가 없었다면 다음 이미지와 같이 'localhost:9000/secured' 페이지를 확인 할 수 있을 것이다.

이제 path를 '/logout' 으로 변경하고 요청을 보내보자.

어떻게 될까??

Logout을 했는데 '/secured' 페이지에 접근이 가능하다!

이유는??


Client에 CAS SSO 를 설정하지 않고 Security 설정에 formLogin() 을 사용 했다면 로그인 화면으로 이동 했을 것이다.

SSO를 적용하지 않은 경우에는 이렇게 동작하는 것이 정상적인 동작이다.


하지만 현재 작업중인 Client 프로젝트에는 SSO 설정을 했기 때문에 로그아웃을 한 뒤에 '/secured' 에 접근해도 로그인 화면으로 이동하지 않는 것이다.


간단하게 설명하면(자세한 설명은 별도로 작성할 예정이다.)

Client에서는 로그아웃을 했지만 CAS 인증서버 에서는 로그아웃 하지 않았기 때문이다.

  1. Client에서 로그아웃을 실행한다.
  2. Logout Filter에서 로그아웃을 진행하고 세션을 만료시킨다.
  3. Logout이 성공하고 logoutSuccessUrl 로 설정한 '/secured' 페이지로 이동한다.
  4. '/secured' 페이지는 인증이 필요하므로 CAS 인증 서버로 redirect 한다.
  5. CAS 인증 서버에는 아직 Client의 로그인 정보가 유효하므로 로그인 요청을 하지 않고 인증성공 응답을 한다.
  6. Client에서는 CAS 인증 서버에서 인증성공 응답이 왔으므로 인증성공 처리를 한다.

위와 같은 이유로 Client 에서 로그아웃 처리를 했어도 인증이 필요한 페이지에 접근이 가능한 것이다.


그렇다면 어떻게 해야 할까?? 간단하다.

CAS 인증 서버에서 로그아웃을 하면 된다.


CAS 인증 서버에 로그아웃 요청을 보내기 위해서는 Client 프로젝트에 다음과 같이 설정이 필요하다.


먼저 CAS 인증서버 Logout을 하기 위해 필요한 Bean을 추가하는 것이다.


CAS Configuration 클래스에 다음과 같이 Bean을 추가하자.

@Configuration
public class CasClientConfiguration {
	//기타 Bean...
    //@Bean
    //CasAuthenticationProvider 등등...
    @Bean
    public LogoutFilter casLogoutFilter() {
        LogoutFilter logoutFilter = new LogoutFilter( "https://localhost:8443/cas/logout",securityContextLogoutHandler());
        logoutFilter.setFilterProcessesUrl("/logout/cas");
        return logoutFilter;
    }
    
    @Bean
    public SecurityContextLogoutHandler securityContextLogoutHandler() {
        return new SecurityContextLogoutHandler();
    }

    @Bean
    public SingleSignOutFilter singleSignOutFilter() {
        SingleSignOutFilter singleSignOutFilter = new SingleSignOutFilter();
        singleSignOutFilter.setCasServerUrlPrefix("https://localhost:8443/cas");
        singleSignOutFilter.setIgnoreInitConfiguration(true);
        return singleSignOutFilter;
    }    
}


각각 설명을 하면 다음과 같다.


casLogoutFilter

cas Server 로그아웃을 하기 위한 filter 이다.
기본 LogoutFilter 와는 별개로 존재 하고 FilterChain 순서 상 기본 LogoutFilter 앞에 위치한다.
/logout/cas URL 을 intercept 해서 Cas Server 로 redirection 한 뒤 전체 Logout 을 실행한다.
서브는 관련된 모든 서비스에 로그아웃 요청을 전송하고 서비스에서는 SingleSignOutFilter 에서 HTTP 세션을 무효하 시키면서 로그아웃이 된다.


securityContextLogoutHandler

logout Filter 가 실행(doFilter) 될 때 해당 Handler 가 사용 된다.
자세한 동작은 클래스 내부의 logout Method 를 확인 해보면 알겠지만 session 을 만료 시키고, SecurityContextHolder 의 SecurityContext 를 가져온 뒤 Authentication 객체를 null 로 만든다.


singleSignOutFilter

  1. cas Server 에서 로그아웃이 완료되면 같은 ID로 로그인 되어 있는 모든 Client 서비스에 로그아웃 요청을 보낸다.
    요청 URL 은 Cas Server 에 등록되어 있는 ServiceId 를 사용한다.
    Cas Server 에서 Client 의 로그아웃 요청을 보낼 때, logoutRequest 라는 parameter 를 함께 보내는데,
    SingSignOutFilter 에서는 logoutRequest parameter 가 존재할 경우에 서비스 로그아웃 처리를 하게 된다.
  2. cas Server 에서 로그인이 완료되면(또는 이미 로그인 되어 있으면) 로그인 요청을 했던 Client 서비스에 redirect 한다.
    이때 ticket 이라는 parameter 를 함께 전달하는데, SingleSignOutHandler 에 ticket 을 저장한다.
    저장 방식은 현재 ID_TO_SESSION_KEY_MAPPING(Map)에 Key : SessionId, Value : ticket 으로 저장하고
    MANAGED_SESSIONS(Map)에 key : ticket, Value : Session 으로 저장 한다.
    이렇게 저장하는 이유는 Cas Server 에서 각각의 Client 서비스에 로그아웃 요청을 보낼 때 사용하기 위해서다.
    Cas Server 로 부터 로그아웃 요청을 받은 Client 는 함께 받은 xml 형식의 parameter 값에서 ticket 값을 얻는다.
    ticket 값으로 MANAGED_SESSIONS 에서 Session 을 가져온 뒤 해당 session 을 만료 시킨다.
    이렇게 되면 Cas Server 를 통해 인증 완료한 뒤 저장되어 있던 session 이 만료 되기 때문에 인증이 만료된다.

그리고 Security 설정에 다음과 같이 추가를 한다.


Bean으로 추가 했던 SingleSignOutFilter와 casLogoutFilter를 Filter에 추가 한다.

그리고 logoutSuccessUrl 을 '/logout/cas' 로 수정한다.

'/logout/cas'는 casLogoutFilter 의 filterProcessesUrl 이다. 즉 '/logout/cas' 로 요청이 왔을 때 Filter가 동작하는 것이다.

client에서 로그아웃 처리를 하고나서 바로 casLogoutFilter 가 동작하는 것이고 casLogoutFilter는 CAS 인증서버에 로그아웃 요청을 보내는 것이므로 진짜 로그아웃 처리가 될 것이다.


client를 다시 실행시켜서 '/secured' 로 이동한 뒤 logout 요청을 보내보자.

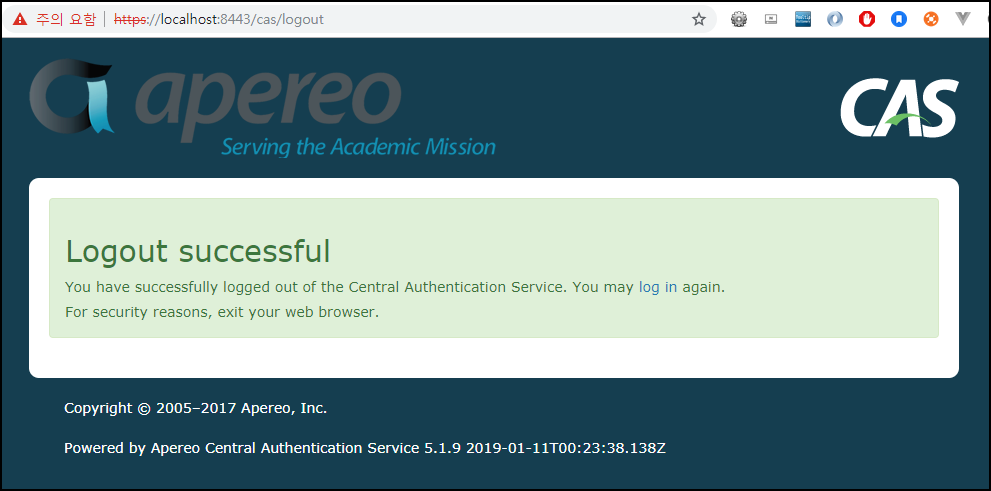
그럼 다음과 같은 화면이 나올 것이다.


;

CAS 인증서버로 redirect 된 것을 확인할 수 있다.

그리고 다시 Client의 '/secured' 로 이동해보면 다음과 같은 화면이 나올 것이다.

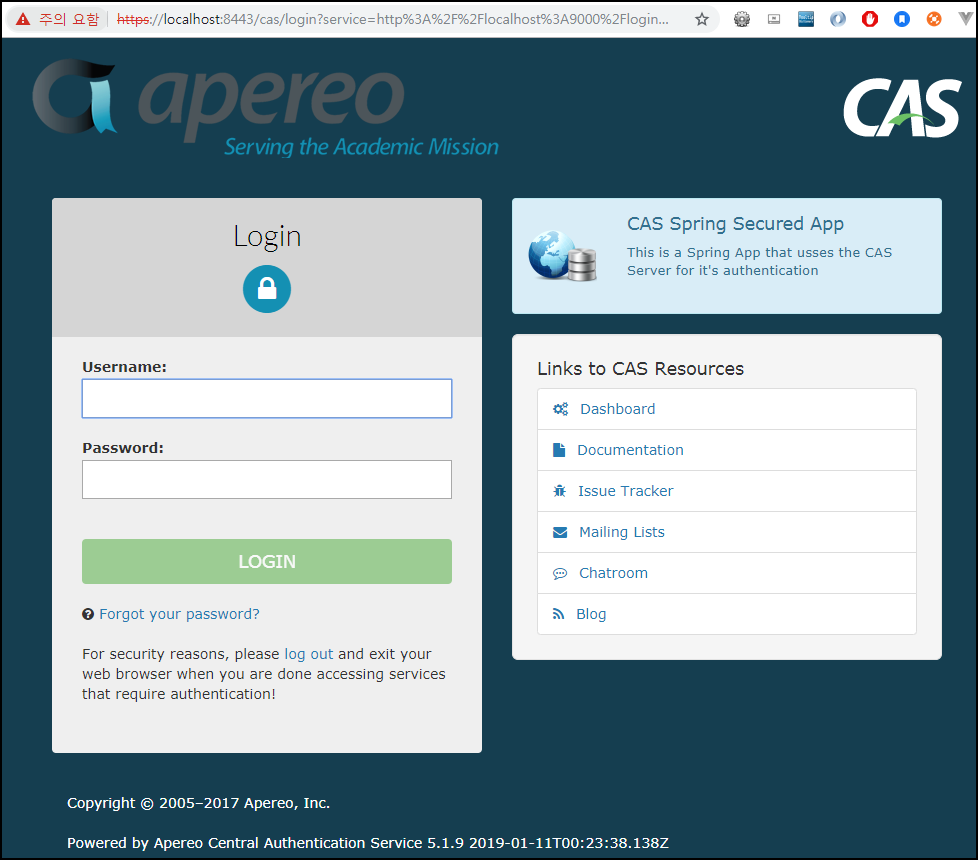
CAS 인증서버의 로그인 화면으로 이동한 것을 확인할 수 있다.

그렇다. Client 로그아웃이 잘 되었다!


이번에는 단일로그아웃에 대해서 알아보자.

단일로그아웃 이란

여러개의 서비스가 하나의 인증서버를 통해 인증처리를 했을 경우, 하나의 서비스에서 로그아웃 했을 경우에 다른 서비스들 역시 로그아웃 처리가 되도록 하는 것을 말한다.


CAS 인증서버 프로젝트에 json 파일로 Client를 등록했던 것을 기억할 것이다.

해당 파일에 logoutUrl 을 추가하면 된다.

사실 logoutUrl 을 지정하지 않으면 serviceId 에서 host 부분을 가져와서 사용하는데, localhost로 되어 있는 경우에는 logoutUrl을 추출하지 못한다.

따라서 현재 테스트에서 처럼 logoutUrl 을 별도로 추가하는 방법

정상적인 domain으로 되어 있는 경우 logoutUrl이 자동으로 등록되는 방법이 있다.


Client 프로젝트 설정은 이미 되어 있고 테스트만 해보면 된다.

시나리오는 다음과 같다.

  1. 두 개의 Client 서비스를 실행한다.
  2. 하나의 서비스에서 로그인을 시도한다.
  3. 다른 서비스에서 인증이 필요한 페이지에 요청을 보내고 로그인이 잘 되었는지 확인한다.
  4. 하나의 Client 서비스에서 로그아웃을 시도한다.
  5. 다른 서비스에서 로그아웃이 되었는지 확인한다.

위 순서대로 테스트 하면 하나의 Client 서비스에서 로그아웃을 했을 때, 다른 서비스에서도 로그아웃이 되는 것을 확인 할 수 있다.


샘플 프로젝트에서 설정한 것처럼 logoutSuccessUrl에 CAS 인증서버의 로그아웃 URL을 보내는 방법 보다는 logoutSuccessUrl에 로그아웃 성공 시 보여지는 화면을 하나 만들고 그 화면에서 CAS 인증서버 로그아웃 요청('/logout/cas')을 처리하는 것이 좋다.

이유는 단일로그아웃에 대한 자세한 설명글에서 다루겠다.

+ Recent posts